Showing posts with label Summer Food. Show all posts

Wednesday, September 4, 2013

Hot Chocolate Ice Cream

Cayenne Pepper in chocolate ice cream?
What do you think?  Ever tried it before?
It's good.  Really good.

Now, if you ask the children, they will tell
you that their favourite chocolate ice cream is not this one.
But, I like it.  And, they eat it.  So, I'm not sure what to think.
Don't you think the proof is in the eating?  I do.  :)

This ice cream is of the no cook variety
and it churns up nicely.
If you serve it right away, it will be soft serve.
If you pop it into the deep freeze for a few hours,
it will harden up and be more scoop-able.  


Either way, it's yummy.

I used whole milk in this recipe.
When I made it, I didn't have almond extract in the house ~
So, I mixed it up without...it was very good.
Next time, I plan to have the extract on hand.
I also ventured slowly into the *hot* side of things and 
only used the smaller amount of cayenne ~
Next time, I will go with the full 1/2 tsp.

I think the cinnamon flavour came through a bit overpowering
since I used the smaller amount of the cayenne and none of the extract.
Next time, I will use the full amounts of everything.

Intrigued?  Ready to give it a try?  Click here!  

**Update ~ Since writing this post I made it again
with the extract and the larger amount of cayenne.
The verdict?  I think it's much better with the extract,
but, the cayenne was a bit overpowering.
I suppose this means I will have to make it one more time
with all the ingredients *corrected*, don't you think?
What a shame.  ;-)

Many Blessings,
Camille

Thursday, July 26, 2012

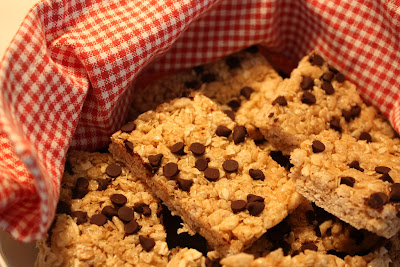
Homemade Granola Bars

Homemade Granola Bars ~
Adapted from the recipe found at Lauren's Latest.
How fun is that?

These granola bars taste similar to the
Quaker Chewy variety ~ but, they're homemade.
Yes, they are sweet.
Yes, they are a treat.
No, they are not for breakfast.

But...oh...are they good! :)

On these HOT days of summer,
it is wonderful to have a treat to make
without having to turn the oven on!

Better and better.


I have a BIG jelly roll pan ~ 12" x 17" ~
If yours is not as big, you might want to make half the recipe.
I line mine with parchment paper ~
there is no need to grease the pan that way.

Here's what you will need ~

1/2 cup Butter
1/2 cup Liquid Honey
2/3 cup Brown Sugar
1 tsp Vanilla
4 1/2 cup Quick Cooking Oats
(Do Not use large flake oats for these!)
2 1/2 cup Rice Krispies Cereal
1/2 cup Mini Chocolate Chips for sprinkling on top

Here's what you do ~

In a heavy saucepan, bring the butter, honey,
and brown sugar to a boil.
Reduce heat and boil gently for two minutes ~ stir often.
Remove from heat and stir in the vanilla.

Measure the oats and cereal into a large mixing bowl.
Pour the hot sugar mixture over the dry ingredients.
Stir until thoroughly combined and all dry ingredients are moistened.

Press into your large pan (12"x17"), or two smaller ones ~
be sure to line them with parchment for easy removal of the bars.
Sprinkle chocolate chips evenly on top and press in a little.


Set aside to cool a little.
I like to cut mine at this point,
and then I put them in the fridge while
they are still in the pan, to cool completely.

If there are any left over,
they may be stored in the fridge,
or even the freezer.
Be forewarned...
they do not last long,
and they taste good frozen!

Enjoy!

Many Blessings,
Camille


Wednesday, October 5, 2011

Esther's Greek Salad

My friend Esther has
shared a number of recipes
with me over the years.

This Greek Salad is
one of my favourites.
It's simple and...
Y.U.M.M.Y.

Thanks for sharing Esther!


~ Esther's Greek Salad ~
(Slightly altered)

One Large Head Romaine ~ Cleaned and torn
One Long English Cucumber ~ Chopped coarsely
Two Large Tomatoes ~ Chopped coarsely
One Small Red Onion ~ Chopped
Four Green Onions ~ Chopped
One Small Tin Olives ~ Drained
Half Pound Feta ~ Crumbled

Put all salad ingredients into large bowl.


~ Dressing Ingredients ~

1/2 Cup Olive Oil
1/4 Cup Red Wine Vinegar
1 tsp Dried Marjoram
(Substitute Oregano if preferred)
1 tsp Sea Salt
1/8 tsp Freshly Ground Black Pepper

Mix up the dressing,
toss with greens and serve.
(I reserve the Feta and
top individual portions with it).

Enjoy!
Camille

**To make this SCD Compliant,
just substitute Freshly Grated
Parmesan for the Feta.

Wednesday, July 13, 2011

Salty Caramel Anyone?

Are you a salty caramel person?
If so, this is the ice cream for you!

Come on over and I will
serve you some with a smile ~
That is, if there is any left! ;-)

Sweet.
Salty.
Yum.


It is time consuming.
And fussy.
And a bit tricky.

BUT...
worth it!
(In my opinion, of course).

After reading about this ice cream
on David Lebovitz' blog,
I knew I had to give it a try.

Do you have an ice cream maker yet?
Hurry...summer is waiting.
And so are your family and friends.

Quick!

This is the one I have.
Gifted to me from my family
for Mother's Day.

(A little tip ~ Amazon's prices fluctuate...
check back periodically for the best deal).

It's been a fun journey.
A person could get used to
having ice cream daily.

I know.


Salted Butter Caramel Ice Cream ~
Oh. Dear. Me!

ENJOY!
And...don't blame me
if you become addicted to
its creamy saltiness! ;-)

Many Blessings,
Camille

**Links are working....

Wednesday, June 1, 2011

Simply Guacamole!

Super Easy!
So. Good. For. You.
Y.U.M.M.Y.

Simply Guacamole.
(Gwa-ka-moe-lee)


I use three or four ripe avocadoes.
(They are ripe when dark in colour
and slightly soft).

Wash the skin and slice length-wise
through to the pit.
Split in half and remove the pit
with the tip of your knife.

Scoop out the flesh with a spoon.
Mash with a fork.
Add in the juice of one lemon.
A splash or two of Hot Sauce.
And a shake of garlic powder.


Mix together.
Taste and adjust seasonings.
Chill and serve.
Enjoy! :)

Monday, May 23, 2011

Chocolatey Scrumptiousness

For a very long time I have had my eye
on an ice cream attachment for my
KitchenAid mixer.

There were a few promises that
had to be made before I could go
ahead and order it.

One of those promises
was that I would faithfully
use the juicer that
I had said would NOT
collect dust in the closet.
In reality,
it has tended to do just that.

Until recently.

Carrot Apple juice
is faithfully
being produced.

Twice per week.


For Mother's Day, the children
contributed towards the purchase of
the desired ice cream attachment with
Howie making up the difference.

It just arrived.

And I've made
ice cream twice.

Rich.
Creamy.
Chocolatey.
Delicious.


As a teenager I worked in a
Baskin Robbins ice cream store.
It spoiled me for life.
Only the *good* stuff will do.
*Regular* ice cream just does not
measure up.

If you know anything about
Baskin Robbins ice cream,
you will probably know about their
Chocolate Mousse Royale flavour.

This would rival that.
In actuality,
I think it surpasses it.

Oh. Dear. Me.!!!


We now have no
need of Baskin Robbins.
This recipe fits the bill ~

P.E.R.F.E.C.T.L.Y.


I pay attention when Jennifer Jo
recommends a recipe.
The ones I have tried have
not failed.
And this was no exception.

Click here to get to the
post where she shares the recipe.
Scroll to the bottom of her post
to get to the necessary information.

You will not be sorry you did.


Proceed with caution...
And be sure to share! :)

Many Blessings,
Camille

**What to do with the leftover Egg Whites?
Just substitute two per each egg called for
in any recipe you make in the next few days.
Freeze the egg whites if you won't be using
them for awhile. Or...just use them to
make scrambled eggs.
But, whatever you do...
don't throw them away! :)

Friday, May 13, 2011

Amazing Salmon ~ Quick and Easy!

Now this was yummy!
Easy to put together...
And perfect for a hot summer day!
(Is it hot where you are?)

What more could you ask for?


I didn't have fennel or dried cherries on hand.
So, I skipped the fennel and used
dried cranberries instead of the cherries.
The vinegar was my choice rather than the champagne,
and I pan-fried the fish in coconut oil.

One of the boys said he didn't have
much hope for it when he saw it.
But after tasting the salmon
said I could serve it to him anytime!
LOL! Is that a rave review, or what??


Click here to get to
the original recipe shared
by Miss Jen at Blessed Femina.

Enjoy!

Monday, May 9, 2011

Summery Lemony Deliciousness

I am a chocolate girl.
Really, I am.

But, I can enjoy other things.
And this is one of those
*Other things*.

Lemony, but not in an overbearing way ~
just the right amount of *tart*.
Suitable for high tea or
a relaxing visit on the front porch.

I would even say you could have them for breakfast,
but that might be taking things a little
too far. :)

These freeze well.
So, if it gets oppressively hot
where you live,
you might want to bake some now
to have on hand for later.
You will not be sorry you did.


~ Lemon Bars ~

As found in
"Company's Coming ~ Most Loved Treats"
by Jean Pare ~
a Canadian cookbook author! :)

~ Bottom Layer ~

2 cups Flour

3/4 cup Icing Sugar
(Powdered or Confectioner's)

1 cup Butter, cold

Combine flour and icing sugar
in medium sized bowl.
Cut in butter until mixture
resembles fine crumbs.
Press firmly into ungreased
9 x 13 inch pan.

Bake at 350 degrees F
for about 20 minutes ~
Until golden.

Remove from oven,
but leave oven on.
Spread top layer over
the cooked base.


~ Top Layer ~

4 large Eggs

1/3 cup Lemon Juice ~
Fresh squeezed

1 Tbsp Lemon Peel ~
Finely grated

1 1/2 cups granulated Sugar

1/4 cup Flour

1 tsp Baking Powder

Icing Sugar ~ for dusting


Whisk eggs in large bowl until frothy.
Add lemon juice and peel and stir.

Combine granulated sugar,
flour, and baking powder in small bowl.
Add to egg mixture.

Stir until just moistened.
Spread evenly over cooked bottom layer.
Bake for another 25 minutes,
or until set.

Let stand in pan on
wire rack for 5 minutes.
Dust evenly with icing sugar
using a small sieve.


Let stand until cool.
Cut into bars.
Freeze for the future...
if you can get them there.
They are even good frozen!

Look out! ;-)

Wednesday, May 4, 2011

Almond Flour Waffles


Here it is...as promised!
Another recipe for Almond Flour.

We like these waffles even better than our old standby.
I've even served them to company!
They get rave reviews.

And they are quick to whip up at a moment's notice.
They cook MUCH more quickly than the *regular* type.
In my waffle maker, they are done in a minute and a half.

Better and better.

Makes you want to get your hands on some
Almond Flour now, doesn't it? :)


~ Almond Flour Waffles ~

As found in the book ~
"Breaking the Vicious Cycle"

1 cup Almond Flour

4 Eggs, beaten

2 Tbsp honey
(preferrably raw and liquid)

1 tsp Vanilla Extract

1/4 tsp Sea Salt

1/4 tsp Baking Soda

Mix all ingredients together in a bowl
with a wire whisk.

Preheat and grease your waffle iron.
(I use coconut oil to grease it ~
melt a little and use a brush to coat the iron)
Be forewarned...you will be sorry if you skip
the greasing step ~
Ask me how I know! :)

Pour 3/4 to 1 cup of batter onto the
waffle iron and cook for about 90 seconds
or until done.

I quadruple this recipe for our family of six.
The boys and Emma all have hearty appetites.
My waffle maker cooks four squares at a time
and one batch would make two of those four-squared waffles.
I hope that makes sense!

Feel free to ask questions.

Enjoy!
Blessings,
Camille


**One thing to note ~
Almond Flour will go rancid if
it's not stored properly.
Keep it in a sealed container in the fridge
or freezer for long term storage.

Sunday, August 29, 2010

Beautiful Blackberries!

There's nothing quite like freshly made
blackberry syrup to enjoy with
Grandma's Waffles!

YUM YUM!

Memories are stirred from
my own childhood days.
We would pick
SO. MANY. BERRIES.
that they would seem to take over the kitchen.

The children and I together got one large bowl full ~
And it only took an hour of picking to fill it.
The process of straining and
cooking up the berries was time-consuming.
BUT well worth the effort!


It's a treat when they are easy to pick!


Reaching for the "best" berries...
always a *little* bit too far away!


Watch out for thorns...they really grab on!


Often they hide under leaves...we hunt for them.


OH. THE. BLISS.

That first taste of yummy syrup was payment enough.
Want to know the "recipe"?
Want to know the "secret"?

I want to tell you that it has taken years to chisel this out.
There was no "tried and true" recipe that I knew of.
It was all "trial and error".
Many of the past jars of "syrup" were really
nothing more than less than firm jelly.
I had to heat it up to get it to the right consistency.

But now...
I think I've got it!
And I'm going to share the "secret"
with all of you! :)

How to go from this...


To this...


To bottled up yumminess!


~ Blackberry Syrup ~


10 cups extracted Blackberry Juice
1/4 package Certo Light Crystals (1 Tbsp)
7 cups Evaporated Cane Juice (Or White Granulated Sugar)
(This is enough for six pints of syrup)

How to make it?

~ Pick the berries

~ Wash the berries

~ Heat the berries just a little and mash
with a potato masher to get the juices flowing

~ Strain the berries with cheesecloth or a strainer to extract the juice
**Be patient**
This step takes quite awhile ~
I found that it took my batch about 4 or 5 hours of drip-drip-dripping :)

~ Measure the juice and hopefully you have enough,
if not, adjust the recipe accordingly

~ Wash your pint-size jars (2 cups) and lids
in hot soapy water and rinse REALLY well

~ Put your glass jars on a cookie sheet in the oven set at
225 degrees to sterilize them
(they should be in there for at least 20 minutes...
leave them while you make the syrup)

~ Boil water in your canner (fill it a few inches from the top)

~ Boil a little pot of water for softening the sealer lids
(don't put the lids in just yet)

~ In a very large pot put your blackberry juice and stir into it
the 1 Tbsp of Certo mixed with 1/4 cup of the sugar

~ Bring to a boil over very high heat (stirring)

~ Stir in remaining sugar and continue stirring...
return to a boil and boil hard (cannot stir down) for 1 minute

~ Remove from heat and stir and skim off foam for 5 minutes

~ During this 5 minutes of stirring,
put your sealer lids into the recently boiled water

~ Remove jars from the oven and fill to 1/4 inch from the top with
syrup, wipe with a clean cloth and place the sealer lid on and screw band
until finger-tip tightened

~ Place in the canning rack and lower into the
boiling water canner

~ Be sure the water covers the tops of your lids by one inch

~ Cover and keep at a gentle boil and simmer 10 minutes

~ Remove from the canner and set aside to cool

~ You should hear the *pop*pop*pop* of sealing jars within minutes of
removal from the hot water bath...SUCH a satisfying sound! :)

Any questions?
Feel free to ask!
I do hope you give it a try...
it really is super yummy!

Blessings,
Camille

Monday, August 23, 2010

Coconut Cream Pie ~ From Scratch!

Do you want to know what
Fraser requested for his birthday dessert?

Cake?

No ~
he asked for THIS!
And was I ever happy!

Summer is not the time to be heating up
the house with BAKING a cake!
And this pie does not heat up the house
one little bit!

Well, I suppose just for baking the shell,
but it's so quickly done.
You could even buy the pre-made kind!
The P.E.R.F.E.C.T. summer dessert.
And really so
EASY!


~ Coconut Cream Pie ~

From a friend long ago...
printed out from her computer's stash of recipes...
Thank you Grace! :)

~ Ingredients ~

For the filling you will need ~

2/3 cup Sugar (I use organic evaporated cane juice)
1/2 cup Organic Flour
1/2 tsp Sea Salt
3 cups Organic Milk
4 Egg Yolks, slightly beaten
2 tsp Pure Vanilla Extract
1 Tbsp Butter
1 cup Medium Unsweetened Coconut

For the topping you will need ~

2 cups Whipping Cream (measured before whipping)
2 Tbsp Sugar and 1 tsp Vanilla to flavour the cream when you whip it
3 Tbsp Toasted Coconut
(you can do this by spreading the coconut onto a parchment-lined
cookie sheet in the oven at 250 degrees for a few minutes...
it doesn't take long and will burn easily ~ watch closely)

1 Deep Dish Pie Shell, baked ~
I used a graham crumb crust this time
(Follow the directions on the side of the box of crumbs)
Or make your own pastry crust ~
It really is a personal preference thing.

~ Directions ~

Combine sugar, flour, and salt in a medium saucepan.
Mix together the milk and egg yolks in a separate bowl
and whisk into the flour mixture in the pan.
Be sure to mix well and turn on the heat to medium.
Cook until mixture boils ~ stirring constantly.
Boil and stir for one minute.

Remove pan from heat and stir in vanilla and butter.
Then stir in coconut.
Pour into baked shell.

Cover with parchment paper and chill till firm and cool.
Spread whipped cream on top to cover evenly.
Sprinkle with toasted coconut to garnish.
Cover with plastic wrap and chill for at least 6 more hours.

Try to share with seven friends/loved ones.
ENJOY!

Tuesday, August 17, 2010

Thirst Quencher ~ For All Ages!

How do you quench your thirst on a hot summer's day?
We've been having another HEAT wave!
The children always ask for
L.E.M.O.N.A.D.E.

And it must be
H.O.M.E.M.A.D.E.

We quench the thirst of the masses...
or at least the neighbourhood children ~
whoever comes when I call gets a glass.


~ Camille's Lemonade ~

Squeeze the juice from as many lemons as it takes to make 1 & 1/2 cups of juice ~
I use organic lemons
Add about 10 cups of water (including the water used in the ice cubes)
Stir in 1 & 1/2 cups sugar ~ I use organic evaporated cane juice

Adjust to taste ~
This is not an exact recipe...
make it your own.

It may be too sweet or strong for you...
add more lemons, water or sugar to make it ~
P.E.R.F.E.C.T.

Be forewarned ~
your customers will appear out of nowhere!

~ Enjoy! ~

Wednesday, July 21, 2010

Danish Cream Squares

This is a WONDERFUL dessert for those
HOT summer days!
Nothing here to heat up the kitchen...
a good thing, right?

My Sister-in-Love gave me this recipe long ago.
I have adjusted it to fit a larger pan on occasion.
It is very easy to make smaller
or larger as the need may be.

Here is the finished cake ~
ready to be served up to some very fortunate guests.


And some of the necessary ingredients...


~ Danish Cream Squares ~


~ Ingredients ~

Graham Wafers ~
enough to line a 9 x 13 pan twice

1/4 cup Bird's Custard Powder ~
Or Vanilla Pudding Mix (6 serving size),
using the appropriate amount of milk...
Or, you could also make your own custard from scratch! :)

3 cups Milk (for the custard)

3 Tbsp. Granulated Sugar (for the custard)

2 cups Whipping Cream (measure before beating)

1 1/2 Tbsp. Sugar (for the whipped cream)

1 tsp. Vanilla (for the whipped cream)

1 cup Icing Sugar (Powdered)

3 Tbsp. Milk (for the icing)

1/3 cup Semi-Sweet Chocolate Chips

1 Tbsp. Butter


~ Method ~

Line a 9 x 13 inch pan with graham wafers ~
cut exactly to fit.

Cook Custard as per the directions on the package,
using the 3 cups milk, the 1/4 cup custard powder,
and the 3 Tbsp. Sugar.
Stir constantly so as not to get lumps! :)
(Ask me how I know)... ;-)

Cool a bit and spread over the top of the first layer of graham wafers.
Cover with plastic wrap or parchment paper and set in fridge to firm up.

Whip the cream with the vanilla and sugar until stiff.

When the custard layer is cold,
remove the wrap (*smile*), and
spread the whipped cream over top.

Cover this with another layer of graham wafers ~
cut exactly to fit.

Mix icing sugar with just enough milk to make a barely pourable glaze
and spread over the top layer of graham wafers.

Melt the chocolate chips with the butter over very low heat.
When melted, drizzle over the top of the cake.
Cover, and refrigerate for at least 6 hours.

Serve and
ENJOY!!

I fear this recipe may sound a bit complicated,
but it is most definitely
NOT!!

Take this scrumptious dessert along to your next summer gathering,
and be prepared to share the recipe!
It's a hit wherever it goes. :)

Thursday, July 8, 2010

Super Easy Strawberry Shortcake


I grew up with this recipe...
it's one of the fond memories I have of
childhood summers.
It really isn't a "recipe" at all!
It's just the easiest dessert you can make
at this time of year ~ with the best results.

Super YUM!

Bake yourself some biscuits or plain scones.
Whip up some fresh cream ~
I like to add in a bit of sugar and
pure vanilla extract to the cream before whipping it.
Get together a bowl full of fresh strawberries.
Now, put them all together in individual bowls.
Adjust amounts of everything to feed one or two,
or to feed a CROWD!

Whatever you do ~
be prepared to serve second helpings.

ENJOY!!

Tuesday, June 29, 2010

Cool Delight ~ Chocolate Shell Coating

Ever wonder how to make the coating for dipped cones without
all the scary "extras" that come in the bottled varieties?
I stumbled on this idea in the comment section of a friend's blog.
It didn't take long to get me experimenting.

The Results?

A "recipe" that is really very simple and sooooo yummy!
Without all the guilt (or at least less of it) ~
No need to buy the bottled stuff ever, EVER again!

AND it's so E.A.S.Y.


~ Homemade Chocolate Shell ~

Take 1/2 cup of chocolate chips and melt slowly over
very low heat in a heavy saucepan on the stove.
Stir in 2 Tbsp. of coconut oil (I use organic, cold-pressed).

**You MUST use coconut oil ~ do not substitute anything else.**

The coconut oil is what will make the coating harden up.
When melted and mixed together ~ but not HOT ~
pour over your dish of ice cream and let set for about a minute.
This amount of sauce will serve four fortunate guests quite nicely.
If you like LOTS of topping,
you might want to increase this recipe accordingly.

ENJOY!

Monday, June 21, 2010

Corinne's Potato Salad

Corinne and I have been friends for most of our lives.
We met in grade one.
Many years ago we went on a picnic together
and she brought this salad along.
It was YUMMY!
She graciously shared the recipe with me and it has been
my "go to" potato salad ever since.
Everyone loves it ~ I'm sure you will too!
The "secret" ingredient is the pickles...
don't leave them out! :)


Corinne's Potato Salad

4 Hard Boiled Eggs ~
cooled and chopped into chunks

6 Large New Potatoes (Red or Yellow) boiled ~
cooled and chopped into chunks

4 Green onions ~ chopped

5 Red Radish ~ minced

5 Dill Pickles ~ chopped

Put all above ingredients into a large mixing bowl.
Mix and pour over top the following dressing ~

1 cup Miracle Whip
(Or your own homemade mayonnaise)
1 1/2 Tbsp Prepared Mustard
1 Tbsp White Vinegar
Salt and Pepper ~ to taste

Mix together and spoon into a serving bowl.
Refrigerate and serve chilled.
Sprinkle with Paprika to make it look pretty.
Enjoy!

Tuesday, June 8, 2010

The BEST Burgers EVER!


WE do not BBQ throughout the winter months.
May is about the time we begin.
AND what else would be more appropriate than burgers to
kick the season off with a bang?


This recipe has a history.

Long ago I was a devoted pre-formed,
frozen hamburger patty girl.
Ease of operation was my motto.

BUT...something happened to change all that!

We innocently stumbled upon the Best Burgers
E.V.E.R. while visiting with friends
one summer day a few years ago.

My sweet friend kindly relinquished the recipe and
life has not been the same since.
These are now the staple burgers served around here...

N.O.T.H.I.N.G. else will do!

The patties can be made ahead of time and frozen
if you are after convenience without sacrificing taste.
OR a batch can be whipped up on the day of the BBQ.
Whatever you choose to do will not alter the results ~
requests all around for the recipe.

AND you have landed in the right place to acquire said recipe.

ENJOY!!

Adapted from the Looneyspoons Cookbook (I think it is this one)...
remember, I got the recipe from my friend!


Esther's Hamburger Patties

1 lb Lean ground beef (organic grass fed, if possible)
2 Tbsp. Onion ~ minced
2 Cloves garlic ~ minced
1 Egg (organic, if possible)
1 Tbsp. Ketchup
1 tsp. Worcestershire Sauce
1/2 tsp. Chili powder
1/2 tsp. Celery Seed (do NOT omit)
1/4 tsp. Cumin
1/4 tsp. Salt (I use sea salt)
1/4 tsp. freshly ground black peppper

Mix together all ingredients except the meat.
Add the meat and work together well.
Form into four 1/4 inch patties and separate with parchment or waxed paper.
Set in fridge (or freeze) until ready to grill.
If grilling from fresh they will take about 5 minutes per side on a medium hot grill...
be sure they are thoroughly cooked!
Fix up with your favourite toppings and enjoy the taste of summer! :)

Friday, May 14, 2010

Salmon Burgers

This recipe was given to me by a dear friend ~
Thanks Claudia! :)

It is an easy (and yummy) way to get salmon into your diet ~
We all know how good it is for us!


Salmon Burgers

1 lb canned salmon with liquid
⅓ c flour
¼ c cornmeal
⅓ c wheat germ
2 eggs
½ c chopped onion
¼ c chopped green pepper (I omit this)
1 Tbs lemon juice


Flake salmon, mashing bones well.
Mix all ingredients together. Form into flat patties.
Brown in oil over medium heat until nicely browned on both sides.
Serve in a bun with tartar sauce or with rice and veggies on a plate.

ENJOY!

Wednesday, February 3, 2010

Idaho Tacos


I got this idea from FB ~ It's not really a recipe, it's just a combo of ingredients that work together wonderfully well! It is SO easy to make and gets rave reviews at my table. It can be adapted for those hot summer days by just doing the baked potatoes on the BBQ ~ wrapped in tin foil and baked until done. Your house will stay cool and you will have a hearty meal to feed those that are hungry for more than a salad! :)


Idaho Tacos

Baked potatoes ~ one per person

Scramble fried beef (or whatever meat you choose) with taco seasoning mix ~
I like to try to avoid the taco seasoning mix, so I seasoned the meat with cumin, chili powder, salt, garlic powder, onion powder and cayene pepper ~ to taste

Shredded cheese

Salsa

Sour cream

Chopped green onions

Chopped tomatoes

Cut baked potatoes into slices on the plates,
sprinkle shredded cheese on top, then the beef and all the toppings...viola!

Enjoy!! :)

Tuesday, January 26, 2010

Mexican Salad

Super Easy and Super Good!

This is a hit at our house and there are virtually no prep dishes to clean up. You will find this on our table at least once a week through the hot days of summer ~ But I have served it twice in the last week.

Why the sudden switch?

My friend thanked me for sharing this recipe with her and told me she had made it THREE times within the first few weeks of January ~ that's the inspiration behind its appearance at our winter table! Maybe it will coax an early arrival of spring? It doesn't hurt to try! :)

Mexican Salad

**Adapted from the
Kraft What's Cooking Magazine ~ Summer 2008 Issue


~ Ingredients ~

Salad Greens (I use organic mixed baby greens)
Tortilla chips (crunched up)
Tins of kernel corn ~ drained (I use two small for six of us)
Tins of black beans ~ drain and rinse (I use two small)
Shredded cheese
Salsa
Kraft Peppercorn Ranch dressing (or sour cream ~ healthier)

~ Method ~

Layer the ingredients in order given on individual plates according to the appetite of your family/guests. This recipe can be doubled, tripled or made for just two...soooo handy for those hot days and there are no prep dishes to clean up!!

ENJOY!!