Showing posts with label Treats. Show all posts

Saturday, November 9, 2013

Mini Breakfast Cheesecakes ~ THM Style

Cheesecake for breakfast?  Is it legal?  ;-)
Is it really possible to eat these little yummies and continue to lose
or to maintain a good weight?  Good news ~ Yes!  :)
This was my breakfast this morning ~ shhh...don't tell.


This is only recommended if you are doing it the Trim Healthy Mama way.
The trick is not to mix fats with sugars/carbs.  
Always wait 2.5 -3 hours before changing your fuel source.
That way, your body burns the fat as fuel and doesn't retain it for future use.

Want to know how to bake some cheesecake
that will treat you kindly and will produce no guilt?
Not even if you should choose to indulge in it for breakfast?
Remember the rule ~ no carbs for at least three hours after consuming.
Two of these will stick with you that long...don't worry.  Yippee!


First, let's discuss the supplies.
Individual custard cups are a must-have for these to turn out right.
You could substitute a large cup muffin tin, but, the cheesecakes will sink.
That would be okay in an emergency.  But, real custard cups are the best option.
Mine are 4 inches across at the widest point and 2 inches deep.

Now...on to the recipe.  :)

~ Mini Breakfast Cheesecakes ~
(Recipe altered from the original found in Trim Healthy Mama)

1 lb (500 grams) Cream Cheese ~ room temperature
2 Large Eggs ~ organic, free-range, if possible
3/4 cup Greek Yogurt ~ Fat Free
2 Tbsp Lemon Juice ~ fresh squeezed
1 tsp pure Vanilla Extract 
10 tsp Truvia (or sweetener of choice)

**If you don't want to follow THM, you could use sugar ~
You'd need about 1/2 cup granulated sugar for this recipe.


Mix all ingredients together in stand mixer.
Once ingredients are well combined, whip like you would for whipped cream.
Beat together until light and fluffy ~ this will take quite a few minutes.
Grease your custard cups with butter and fill nearly to the tops with batter.
This recipe will make 7 mini cheesecakes.


Set custard cups onto a jelly roll pan (cookie sheet with sides),
and add water to the pan as shown above.
Set into the pre-heated oven to bake.
Bake at 350 degrees F for 30 minutes until tops are just turning golden.


Remove to cooling racks to cool completely.
Cover with plastic wrap and refrigerate until cold.
Serve topped with Greek Yogurt or whipped cream and berries.
These are also super duper yummy all by their lonesomes.  :)

Enjoy!  Banish the guilt!

Many Blessings,
Camille

**This recipe is THM *S* ~

Wednesday, September 4, 2013

Hot Chocolate Ice Cream

Cayenne Pepper in chocolate ice cream?
What do you think?  Ever tried it before?
It's good.  Really good.

Now, if you ask the children, they will tell
you that their favourite chocolate ice cream is not this one.
But, I like it.  And, they eat it.  So, I'm not sure what to think.
Don't you think the proof is in the eating?  I do.  :)

This ice cream is of the no cook variety
and it churns up nicely.
If you serve it right away, it will be soft serve.
If you pop it into the deep freeze for a few hours,
it will harden up and be more scoop-able.  


Either way, it's yummy.

I used whole milk in this recipe.
When I made it, I didn't have almond extract in the house ~
So, I mixed it up without...it was very good.
Next time, I plan to have the extract on hand.
I also ventured slowly into the *hot* side of things and 
only used the smaller amount of cayenne ~
Next time, I will go with the full 1/2 tsp.

I think the cinnamon flavour came through a bit overpowering
since I used the smaller amount of the cayenne and none of the extract.
Next time, I will use the full amounts of everything.

Intrigued?  Ready to give it a try?  Click here!  

**Update ~ Since writing this post I made it again
with the extract and the larger amount of cayenne.
The verdict?  I think it's much better with the extract,
but, the cayenne was a bit overpowering.
I suppose this means I will have to make it one more time
with all the ingredients *corrected*, don't you think?
What a shame.  ;-)

Many Blessings,
Camille

Thursday, August 8, 2013

Homemade Caramel Syrup

Oh. Dear. Me.
This stuff is crazy good!
Eaten by the spoonful, poured onto pancakes or waffles,
or drizzled over ice cream ~ it's scary to think of all the possibilities.
Never again will it be necessary to purchase caramel topping.

This will fit the bill ~ every time.


And, if you need to pay an actual bill, 
it might work as a substitute for money.
My Dad accepted some as payment for his lawnmower 
blade sharpening services ~ true story.  :)

Click here to find the original recipe ~
You won't be sorry you did.  
Well, maybe you will ~ perhaps I will post an exercise routine next.
No, not really ~ but, you could create your own.
Trust me ~ it may become necessary.  *Wink*

Many Blessings,
Camille

Thursday, March 21, 2013

Homemade Fudgesicles

Homemade is always best, right?
I've always thought so.  

My sweet friend *C* gave me this recipe last summer,
but, alas...I didn't have the appropriate equipment.
Aka ~ a popsicle mould.
When I searched for them, they were sold out.
The other day at WalMart I spotted some popsicle moulds,
and even though it isn't summer yet,
I snapped them up.

You know what I did then, right?
You guessed it.  I made fudgesicles.
Yes, I did!  :)

They didn't last long.
Yummy.  Nummy.  
Chocolately wonderfulness.

So, grab your popsicle moulds and get going.
Everyone in your home will thank you.
That is, of course, if they like chocolate.
If they don't, I cannot help them.
However, that would mean there will be more for you.  

Yippee!  :)


~ The Recipe ~

2 tsp Corn Starch
1 1/2 cup Whole Milk
1 1/3 cup Whipping Cream,  not whipped
1/2 cup Sugar 
1/3 cup Cocoa Powder
1/4 tsp Sea Salt
2 tsp Vanilla Extract

Bring all ingredients, except the vanilla,
to a boil in a medium-sized, heavy-bottomed saucepan.
Boil 1 minute, remove from heat and stir in vanilla.
Cool completely and pour into 10 Popsicle moulds.
Transfer to freezer and wait until solid ~
approximately four hours.

Enjoy!

Many Blessings,
Camille

Monday, January 14, 2013

A-mazing Oatmeal Options!

How is your oatmeal repertoire?
Do you even eat oatmeal in your home?
Does it ever get boring to have plain old oatmeal every day?
No, really?  It does?  Yup, me too.
Get ready...because...
This, my oatmeal-weary friends, is the post for you!

Let me share with you some of my new finds ~
A-mazing Oatmeal Options!!
And, yes...they really are that good!!  :)  
 First up ~ Basic Chocolate Oatmeal originally posted by Katie
who writes the "Chocolate Covered Katie" blog.
Okay, is it even right to make your oatmeal into dessert?
Let's not even open up a debate on that one...agreed?  
Oh, and if you don't like chocolate, you won't like this.  :)

Here's what I did to make it mine.
This will make enough for about four ~
depending on hunger levels.  

5 cups Liquid ~ I used half water and half milk ~ 
(or, all of one or the other)
2 cups Old Fashioned Rolled Oats ~
(You could substitute Quick Cooking oats...
just reduce cooking time accordingly)
3/4 tsp Sea Salt

Put these three ingredients into a medium sized,
heavy-bottomed pot.
Bring to a boil over medium-high heat while stirring.
Reduce heat to medium-low and simmer partially covered
for about 8 to 10 minutes, until it gets creamy.

Stir in the following, and mix well ~
3 Tbsp Dutch Processed Cocoa Powder
1/3 cup Sugar ~ I use dehydrated cane juice
1 tsp Vanilla Extract

Cover with lid and let sit off the heat 
for about 5 minutes prior to serving.
Stir in more of your choice of liquid, if necessary.
Serve with a few chocolate chips sprinkled on top (yes, really!).
And, some chopped nuts ~ I like pecans.
Drizzle with milk or cream.

Dig in ~ I dare you!!  ;-)
 Next up ~ Apple Cinnamon Overnight Oatmeal originally
posted on the "Real Mom Kitchen" blog.

A little less dessert-ish, but, completely yummy-ish ~
This recipe fits the bill for a great crock pot breakfast that
can be prepared the night before.
Who does not like to have the morning's work done ahead of time?
And, what could be better than waking up to a cinnamon-y,
apple-ish-ously smelling home in the morning?
Nothing.  That's what!

This recipe will serve six to eight hungry adults.
If you like creamy rice pudding, you will like this.
Yum.  Yum!

One more thing...I found it necessary to fill my
large crock pot half full with water and then I used a 2.5 Litre (2.5 Quart)
casserole dish to hold the recipe ingredients.
I placed this dish into the water and then put the crock pot
lid on the whole thing.
The first time I made this recipe it burned...
perhaps I just have a weird crock pot...
could very well be!


Whatever the reason, it was not pleasant.
Only half the oatmeal was salvageable.
However, the second time I made this, 
I did the insert thing and it worked beautifully!
No burned stuff to scrape off.
And, every last bit of this yummy oatmeal 
was ready to gobble down.

Yippee!! 


3 Gala apples cored and chopped ~ skin on
3 cups Milk
2 cups Water
1 cup Apple Juice ~ I like organic, fresh-pressed
2 cups **Steel Cut Oats ~ uncooked
**(Don't use regular oatmeal in this recipe...
it will become too mushy!)
1/4 cup Maple Syrup 
2 Tbsp Butter ~ cut into little pieces
1/2 tsp Sea Salt
1 tsp Vanilla Extract
1/4 cup Brown Sugar
2 tsp Cinnamon ~ ground

Butter your casserole dish.
Mix all ingredients together and carefully pour 
into the casserole dish.
It will come nearly to the top.
Stir well.

Place into your crock pot. Put the lid on.
Turn the heat to low and set on the counter
to cook while you sleep.
This will take about 7 to 8 hours.

Mine burned after about 5 hours on my first try,
when I cooked it directly in the crock pot.
No fun!  I woke up at about 4:30 am to the smell of burnt sugar.
Take my advice, and use the casserole set-up
and there will be no issues.
It is so worth it!!

In the morning, remove your casserole dish
from the crock pot and stir the oatmeal prior to dishing it out.
Serve with chopped pecans, raisins,
a little more brown sugar and milk or cream.
Enjoy!!  And...do let me know what you think!  :)

Many Blessings,

Camille

Monday, December 17, 2012

Chunky Chocolate Morsels

Friends far and near ~
Listen up!

These are one of the BEST and YUMMIEST
of the many Christmas treats out there.
My Mum-in-Love faithfully made this recipe
year after year after year.
They were a staple treat at Christmas time.
And, long ago, she graciously shared the recipe with me!
Thank you precious Mum!

Easy.  Simple.  No baking.  
I do believe you will thank me for this.

~ Chunky Chocolate Morsels ~

In a medium heavy-bottomed saucepan,
bring the following ingredients to a boil ~

1 1/2 cup sugar
1/2 cup butter
1/3 cup unsweetened cocoa powder
1 tsp sea salt
1/2 cup milk (I use whole milk)

Once it's come to a boil,
reduce the heat to medium and cook until thickened.
This will take approximately 5 minutes.

Remove pan from heat and stir in 1 1/2 tsp vanilla.
Let cool a little.
Stir in the following ingredients and mix thoroughly ~

2 cups rolled (or quick cooking) oats
2 cups unsweetened, shredded coconut
1 cup coloured mini marshmallows, cut in half with kitchen shears
1 cup chopped pecans (I use soaked and dried)
1/2 cup drained maraschino cherries, chopped

Scrape mixture out of pan and into a medium bowl.
Cover and refrigerate for a few hours or overnight.
Once cool, roll between your palms to make 1 inch balls.
Roll in coconut and store in fridge or freezer.
Separate layers with parchment or waxed paper.

Enjoy!

With Love,
Camille


**If you know where this recipe originally came from,
please do share so I can properly give credit!
Thank you.  :)

Thursday, September 20, 2012

Doughnut Muffins

Do you like cake doughnuts?
If so, these muffins will satisfy your cravings.

Nutmeg-gy 
(not a word, I know...but, I like it, don't you?) 
and Sweet ~

Satisfyingly filling and yummy...
a great start to the day, 
or a perfect mid-afternoon snack.

What are you waiting for?


This yummy recipe comes from a British cookbook ~ 
"Brunch" by Parragon books.


~ Doughnut Muffins ~ 

 3/4 cup Butter, at room temperature 
1 cup sugar, I use organic dehydrated cane juice 
2 Large Eggs, slightly beaten 
2 1/2 cups Flour 
3/4 Tbsp Baking Powder 
1/4 tsp Baking Soda 
Pinch of Sea Salt 
1/2 tsp Nutmeg, ideally freshly grated...yum yum! 
1 cup Milk (may need a little more to make the batter less thick) 

 Beat butter and sugar together in mixer bowl until creamy. 
Add eggs one at a time and whip after each addition. 
Whisk the flour, baking powder and soda, 
salt and nutmeg together in a separate bowl. 

Add half of the dry ingredients to the 
creamed butter mixture together with half the milk.
Gently fold together. 

Add in remaining dry ingredients with the 
remaining milk and stir gently until just barely mixed.
Spoon into 12 muffin cups lined with paper liners.


Bake in 350* F oven for 15 to 20 minutes 
until toothpick comes out clean. 

While the muffins are baking, 
mix together 1/2 cup powdered sugar (icing sugar) 
with 1 tsp ground cinnamon in a bowl.
Melt 2 Tbsp butter in a small pot on the stove 
 or in a bowl in the microwave. 

 As soon as the muffins come out of the oven, 
leave them in the pan and brush butter over the 
tops of a few muffins and then sift the sugar 
and cinnamon mixture over top.
Repeat until all the muffins are dusted heavily with the topping. 
 Remove to a cooling rack and enjoy while still warm! 

 Happy Baking! 

 Many Blessings, Camille

Thursday, July 26, 2012

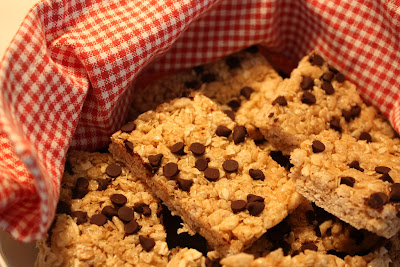
Homemade Granola Bars

Homemade Granola Bars ~
Adapted from the recipe found at Lauren's Latest.
How fun is that?

These granola bars taste similar to the
Quaker Chewy variety ~ but, they're homemade.
Yes, they are sweet.
Yes, they are a treat.
No, they are not for breakfast.

But...oh...are they good! :)

On these HOT days of summer,
it is wonderful to have a treat to make
without having to turn the oven on!

Better and better.


I have a BIG jelly roll pan ~ 12" x 17" ~
If yours is not as big, you might want to make half the recipe.
I line mine with parchment paper ~
there is no need to grease the pan that way.

Here's what you will need ~

1/2 cup Butter
1/2 cup Liquid Honey
2/3 cup Brown Sugar
1 tsp Vanilla
4 1/2 cup Quick Cooking Oats
(Do Not use large flake oats for these!)
2 1/2 cup Rice Krispies Cereal
1/2 cup Mini Chocolate Chips for sprinkling on top

Here's what you do ~

In a heavy saucepan, bring the butter, honey,
and brown sugar to a boil.
Reduce heat and boil gently for two minutes ~ stir often.
Remove from heat and stir in the vanilla.

Measure the oats and cereal into a large mixing bowl.
Pour the hot sugar mixture over the dry ingredients.
Stir until thoroughly combined and all dry ingredients are moistened.

Press into your large pan (12"x17"), or two smaller ones ~
be sure to line them with parchment for easy removal of the bars.
Sprinkle chocolate chips evenly on top and press in a little.


Set aside to cool a little.
I like to cut mine at this point,
and then I put them in the fridge while
they are still in the pan, to cool completely.

If there are any left over,
they may be stored in the fridge,
or even the freezer.
Be forewarned...
they do not last long,
and they taste good frozen!

Enjoy!

Many Blessings,
Camille


Wednesday, June 13, 2012

Something Yummy

White flour.
White Sugar.
Icing Sugar.
Butter and Jam.

Not exactly in the category of *healthy* ~
But, they certainly are *fun* and *yummy*!

This one's for you Miss T. :)
And for your siblings ~ especially the older ones
who like to sabotage my blog ~ LOL!


Originally posted here.
Thank you Jenn for allowing me to re-share!
Emma has requested these (nearly a year in advance)
for her birthday dessert in place of cake!
Yup, this recipe is a winner.
And, easy as pie! :)

~ Ingredients ~

2 1/2 cups Flour
1/2 tsp Sea Salt
1/4 tsp Baking Powder
2 Tbsp Sugar
1 cup Unsalted Butter, chilled
6 to 9 Tbsp Cold Water

Stir together all dry ingredients in bowl.
Cut in chilled butter until the size of peas.
Stir in water, beginning with smallest amount
and adding in enough to barely hold dough together.
Do not over handle dough.

Chill 1 hour.
(I skipped this step and they
still turned out fabulous).


~ Method for Pop Tarts~

Roll out half the dough at a time until thin ~
perhaps an eighth of an inch ~
on a floured surface.
Cut into 3 inch squares.
Lay half of the squares on a cookie sheet
lined with parchment paper.

Into the center of each of the squares,
drop a spoonful of jam ~ any type will do.
Wet the edges of the squares with water.
Put another square of dough over top.
Seal the edges with the tines of a fork.

Set a second pan up to repeat the above
while the first batch are baking.

Bake in a 450 degree oven for about 15 minutes.
They will be golden when done.
Cool 5 minutes on pan.

Transfer to a cooling rack.
Mix up a batch of frosting.

(I used butter icing ~
1/4 cup butter, room temperature
a little water and 1 tsp Vanilla ~
Using a wire whisk,
beat in enough icing sugar to make a
smooth, spreadable icing.)

When the pop tarts are cooled a little,
spread with icing and sprinkle with coloured sugar.


This recipe makes 16 to 20 pop tarts.

Have Fun!
Blessings,
Camille

Monday, June 4, 2012

Dried Cranberry Cheesecake Muffins

Definitely in the category of *Dessert*...
these muffins are rich and yummy.
I must confess...
We had them for breakfast.

Oh. Dear. Me.

The original recipe called for dried cherries.
But, it did say that dried cranberries
would work just as well.


Dried cranberries were what I had on hand, so...
dried cranberries were what I used.

They worked great!

Adapted from the "Brunch Cookbook" by Parragon Books

~ The Ingredients ~

1/4 cup Butter ~ melted
1 pkg Cream Cheese (250g or 8 oz) ~ softened
3/4 cup Sugar
3 large Eggs ~ lightly beaten
2 cups Flour
1 Tbsp Baking Powder
1/4 tsp Sea Salt
1/2 cup dried Cranberries
(or Cherries, chopped)
Icing Sugar (Confectioner's) for dusting


~ The Method ~

Melt butter and let cool slightly.
In large bowl, whisk together the cream cheese
and sugar, add the egggs one at a time,
then stir in the melted butter.

Stir together the flour, baking powder, salt
and cranberries in a separate bowl.
Stir the dry ingredients into the wet
carefully ~ do not overmix.

Line 12 cup muffin tin with paper liners.
Spoon batter into each cup ~ divide evenly between the twelve cups.
Bake at 350 degrees F for about 15 to 20 minutes**
until golden brown and a toothpick comes out clean.

**I re-baked these to check on the timing.
It took a little more than 20 minutes for mine to be done.


Remove from the oven and dust immediately with icing sugar.
Cool in pan 5 minutes before removing to cooling racks.
Serve warm or cooled ~ I like mine warm. :)

Enjoy!
Many Blessings,
Camille

Monday, May 21, 2012

Potato Doughnuts

Okay, these really are scary!
Clog your arteries time.
But, oh are they Good! :)

Make them at your own peril.
I will not be held responsible.
*Wink*

Want the recipe?
For the once-every-ten-year
doughnut feast??

You know you do!


My growing up years are speckled
with memories of fabulous food.
My Mom is a fabulous cook.

And so it went.

Potato doughnuts were a treat.
We didn't have them often.
But, when we did.

We did.

I remember the kitchen being taken over by
doughnuts hot from the cooker.


Oh. Dear. Me.

I cut the recipe in half and
there were still about 4
dozen doughnuts to contend with!
And again...

Oh. Dear. Me!!

Don't worry. We shared.
I froze some ~ Although, they really
are best hot off the press...
think ~ Krispy Kreme. :)

~ The Ingredients ~

2 Tbsp (or packages) Yeast
1 cup warm Water
2 tsp Sugar
4 Eggs
3 cups Milk ~ scalded
1 cup Butter ~ softened
1 cup Sugar
1 Tbsp Sea Salt
1 tsp ground Nutmeg
1 cup well mashed Potatoes
(previously cooked and cooled)
8 cups Flour
Oil for deep frying
(I used Canola)

~ The Method ~

Proof your yeast in the
warm water with the 2 tsp sugar
dissolved in it for about 10 minutes.
It should foam up.
That's how you know it will
do the job in the dough.


Meanwhile, in a large bowl, pour the scalded milk
with the softened butter and mix until melted.
Stir in the 1 cup of sugar until dissolved.
Using a whisk, mix in the eggs, sea salt, nutmeg,
mashed potatoes, and the foamy yeast mixture.

Add in 4 cups of the flour
and stir in the remaining 4 cups
a cup at a time until the dough pulls away
from the sides of the bowl.
Knead in enough flour to make a soft dough.

Set in a warm place and cover
with a clean cloth.
Let the dough rise double.
It may take an hour or so.

Once doubled in size,
punch the dough down.

It will be very soft
and slightly sticky.
Lightly flour your counter
and roll out to about
half the desired thickness
you want your cooked doughnuts to be.
Cut into doughnuts
and let sit on the counter
until risen to nearly double in size.

This will likely take another hour.


In a wide heavy bottomed pot,
heat about four inches of oil to 375 degrees F.
Use a candy thermometer for an accurate reading.
Or, use your deep fryer if you have one! :)

Carefully slide a few doughnuts into the oil
and flip over with tongs when golden brown.
They don't take long ~ 10-15 seconds per side.
Careful you don't burn them or yourself!
Hot oil is HOT!


Set out cooling racks with
paper towels spread on them
for the doughnuts coming hot off the press!
The paper towels will soak up any
unwanted extra grease.

Remove doughnuts from the hot oil
with tongs and set on the paper towels
to cool a little.

While still warm, toss a few at a time
in a bag partially filled with icing sugar.
You could also use your favourite
glaze after they are completely cool.

Call the masses...
there will be enough for a crowd!
Enjoy!

Many Blessings,
Camille

Thursday, May 10, 2012

Banana Nut Bread ~ A Classic

Please tell me you
have some yummy ripe,
speckled bananas sitting
on your counter to use...
'cuz I have just the
recipe for you!

It's a Classic.

Growing up,
my Mom would whip up a loaf
or two of this
fabulous banana bread ~
Complete with chocolate chips.

Everything goes better
with chocolate, don't you think?
We certainly thought so ~
It was our motto. :)


Classic Banana Nut Bread
(With Chocolate Chips)

~ Originally written out
from a recipe that my Mom had
written out...long, long ago!
(Tweaked a little, of course) ~

1/3 cup Butter, softened

1/2 cup Sugar
(I use organic and I use less...
perhaps 1/3 cup)

2 Eggs

1 3/4 cups Flour
(I use 1 cup Unbleached All Purpose,
and 3/4 cup Whole Wheat ~ Organic)

1/2 tsp Baking Soda

1 tsp Baking Powder

1/2 tsp Sea Salt

1 cup mashed Bananas

1/2 cup Pecans, chopped

1 cup Chocolate Chips
(If you use Milk Chocolate,
reduce sugar by half)

Cream together butter and sugar.
Add eggs and beat well.
Stir together dry ingredients
with a wire wisk in a medium sized bowl.
Set aside.
Mash bananas, measure,
and set aside.

Add about 1/3 dry ingredients
to mixer and blend.
Add about 1/3 of banana
to mixer and blend.
Continue adding dry and wet
ingredients alternately to mixer
until all used up.

Stir in nuts and chocolate chips.

Scrape into a parchment paper
lined (or well greased) loaf pan.
(Mine is 9 1/2" x 5" x 3")

Bake at 350 degrees F
for about 50 minutes until done.
(It sometimes takes nearly an hour) ~
Test with a toothpick in the centre
of the crack ~ It should come out
relatively clean...not gooey. :)


About that cracked top ~
Apparently it's supposed to be there.
It means you've got banana bread success!
Who knew?

Once it's out of the oven,
Turn out onto a cooling rack.

Cool completely
(if you can wait that long)
before slicing.
It is especially nice warm,
but really, loaves like this are
best left until completely cool
and even until the next day
to fully ripen.

Just be sure to cover
when cool to keep it from drying out.
This loaf freezes well.

While you are at it,
you might want to make two ~
One for now, and one for later.

Enjoy!
Blessings,
Camille

Monday, March 19, 2012

Chai Tea Latte ~ Homemade

Chai Tea Latte with Vanilla
is my preferred indulgence
whenever I go to Starbucks.

Y.U.M.

Recently, I was there
with a friend and our
two little girls.
As, per usual, I ordered
my usual.


And my friend asked if
I wanted the recipe for a
homemade Chai Tea.
You know what I said, right?

Yup.
That's right.

So, now I can share with you!
Are you excited?
You should be! :)

Measure out 1 cup water per
tea bag and set in a pot to boil.
(I really like this made with
Vanilla Rooibos...but,
any regular tea will do!)


Reduce heat to simmer and add
1 heaping teaspoon each of
the following whole spices (not ground) ~
Cardamom, Cloves, Fennel, and a Cinnamon stick.
Simmer for about 10 to 15 minutes
with lid partially vented.

Add in a heaping teaspoon of brown sugar
and 1 cup of full fat milk.

Heat through, but do not boil.
Strain and serve.


This recipe makes enough for one
GIANT mug or two regular sized ones...
with no option for seconds.

Enjoy!!

Thank you my sweet
friend for sharing! :)

Many Blessings,
Camille